

There are three methods to connect to excel files with CData - Excel, SharePoint Excel, and Excel Online. This article discusses the Excel one. If you want to connect to more than one excel file at a location, the only option is to use Excel Online, however, you will also have to store these files in sharepoint or onedrive to connect to them.
Connect with the Excel provider
To set it up
- Locate a excel file in a folder press and hold Shift and right-click on the file, click copy as path
- Paste this in the URI field, and click OK.
- Define the Row Scan Depth field, as a numeric value. If this value is changed to:
- 0 - the provider will read the whole file before deciding on the fields' data types.
- 10,000 - If the file is very large, it can take a long time to synchronize the data source, and read the whole file to determine the data types. In this case, it is recommended to set the row scan depth to a value between 1,000 and 100,000.
The option areas you will generally use are Authentication, Azure Authentication, Connection and Data.
There are a lot of available options. Some exclude others, this is the case for all CData providers, you do not need to use all of them. Also, check the guide CData ADO.NET Provider for Excel. Especially check Establishing a Connection and Connection String options.
Authentication
In this area you set up the user you want to connect as, the sort of authentication method you would use, and if used the edition of SharePoint.

Excel Authentication
- Access Key: Is for Oracle connections, you can see where it is used in the connection options below.
- Auth Scheme:
- Select the option that fits what type of authentication you wants to use.

Auth scheme options
- Select the option that fits what type of authentication you wants to use.
- Password: If needed add it here
- Secret Key: Is for Oracle connections, you can see where it is used in the connection options below.
- Share Point Edition: If you connect to a file stored in SharePoint and it is not an online version set it to SharePointOnPremise otherwise keep the default value.
- User: Add the user name for the password
Azure Authentication
These options are for when you need to connect to a file stored in an Azure blob store, container, and similar.

- Azure Storage account: This is the name of the Storage account where your container or file share is located.
- Azure Access Key: This is the key you use to connect to the storage account.

- Azure Shared Access Signature: This is used as another way to connect but is generally not used for connecting to files
- Azure Tenant: This is the id of your company. If you go to the Azure Active Directory in the Azure Portal you will find it there as the Tenant ID.

- Azure Environment: This Is where the storage account is located, but I would not change or use it.
Connection

In this area you can set up the connection to a file, as explained above, specify what sheet you want to connect to, the range of it. this is also where you can set up various settings such as what culture the file is created in, what culture it should be, and specifying what charset the file uses.
You can add a range in the Define Tables field with the following setup.
DefineTables="Table1=Sheet1!A1:N25,Table2=Sheet2!C3:M53"So if your file is structured like so and the file is named Data.

It means that in the Define Tables field you need to add what is below. If you do not know what the max amount of rows are, you can add a B* value as a way to get around it. More is explained here Select data
Data=Sheet1!B2:E7You should always add your connection options in the URI field, the Excel File field is deprecated.
The options can be seen here in the Establishing a Connection link, the optional and required fields are shown.
For Azure Blob or azure file share connections, the following is necessary.
Set the URI to the name of your container and the name of the blob/file share. Additionally, set the following properties to authenticate:
- AzureStorageAccount
- AzureAccessKey
For example:
URI=azureblob://mycontainer/myblob/file.xlsx; AzureStorageAccount=myAccount; AzureAccessKey=myKey;You can also use the OAuth Authentication to connect with Azure Blob Storage. For example:
Auth Scheme=OAuth;Initiate OAuth=REFRESH; OAuth Client Id=<Client Id code>; OAuth Client Secret=<client secret code>; OAuth Version=2.0; URI=azureblob://mycontainer/myblob/file.xlsx;You can also connect to files on an FTP server like below.
Set the URI to the address of the server followed by the path to the Excel file. To authenticate, set User and Password.
URI=ftps://localhost:990/folder1/file.xlsx; User=user1; Password=password1;It is important to note that you cannot point to just a folder, it has to be a specific file.
If you want to connect to a single Excel file stored in SharePoint you can do so. Here below you can see a list of available connection options.

Data source connection options
Based on that connecting to a SharePoint file using REST requires you to use an APP which will be explained in the Excel Online part and then the following query in the URI field.
Auth Scheme=OAuth;Initiate OAuth=REFRESH;OAuth Client Id=<Client Id code>;OAuth Client Secret=<client secret code>;OAuth Version=2.0;URI=sprest://Product/Engineering/TestData/EvilWorkBook.xlsxYou do not need to specify what SharePoint server to look at as this is handled by the Authorize OAuth command.
Data
Is an area with some options to allow or deny specific settings, such as how to handle null values or empty fields.
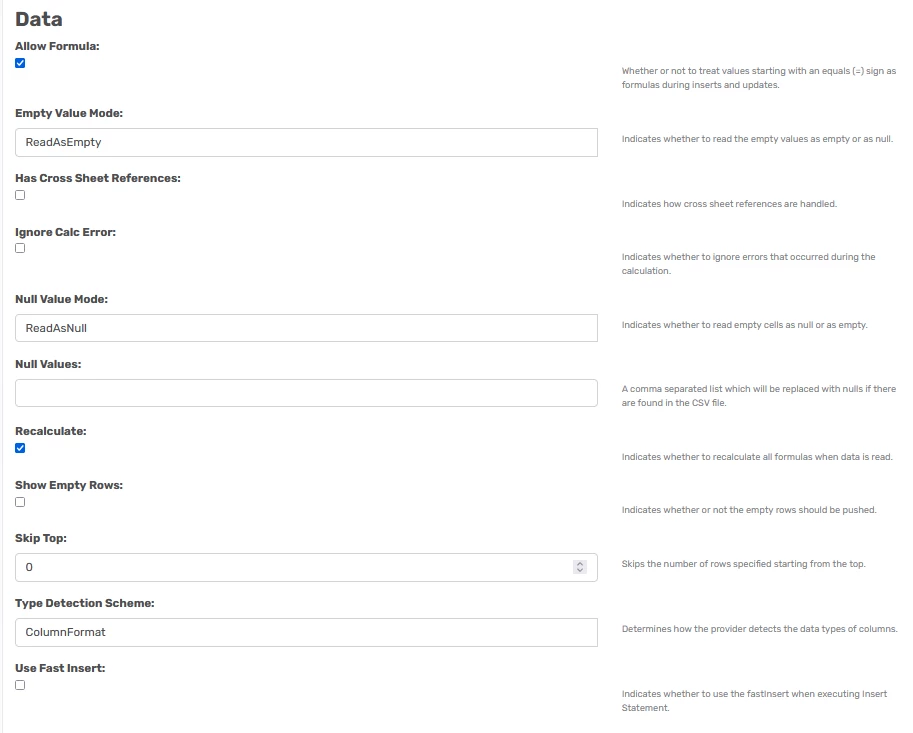
The field Type Detection Scheme is usable when you can’t get the provider to read the correct data types of the fields even when you set the Row Scan Depth to 0. Then you can change the setup to RowScan and it will set all fields to be String(2000) values. You can then change the field types later on in a data type override or in a DWH table.